First, the instrument features
GHG—9040N precision oven adopts forced blasting and reasonable placement of high-performance heating elements and scientific distribution of hot air convection holes, which can maximize the temperature inside the box, and the uniformity of each point in the box can be optimal. Up to ±1%, comparable to dry boxes in Japan, Taiwan, Germany and other places.
The instrument adopts multi-band programming intelligent control system, which can set the temperature arbitrarily. After the N degree is reached, the temperature is constant for N minutes, and then the temperature is raised by N degrees and then the temperature is constant for N minutes. And can control the heating rate. It is especially suitable for tests on the uniformity of temperature uniformity in electronic components, rubber, plastics, coatings, bamboo, wood, decorative materials, etc. Second, the instrument instructions: 1. Open the box door, put the object to be processed into the shelf on the box, and close the box door.
2. Turn on the power, insert the three-pin plug into the power socket, and set the power switch on the right side of the panel to the “on†position. At this time, the meter displays a digital display, indicating that the device enters the working state.
3. Set the temperature inside the box by operating the temperature controller on the control panel.
4. The instrument starts to work, the temperature inside the box gradually reaches the set value, and after the required drying treatment time, the processing is completed.
5. Turn off the power supply. After the temperature inside the box is close to the ambient temperature, open the door and take out the object.
[! 】Please note: Pay attention to the temperature inside the box when opening the door to avoid burns.
three. Instrument operation panel function 
Normal operation method:
Turn on the power and press the ↑ button for two seconds to make the SV window appear STOP. Setting procedure: Press the ↠key to display C01. Press â†â†‘↓ to set the desired temperature. Press the SET button and the PV displays t01. Press â†â†‘↓ to set -1. Wait until the menu is returned (SV shows STOP). Press the ↓ button again for two seconds, and the SV will display RUN. At this time, the PV shows the temperature rise. The SV window HOLD and the set temperature are alternately displayed.
For example: to keep the instrument at 100 °C for a long time, press the ↠key once C01 = 100
Press SET button once t01 = -1
Wait until the SV returns to STOP, then press the ↓ key. When the SV displays RUN, the instrument starts to work.
Timing function operation method:
Turn on the power and press the ↑ button for two seconds to make the PV display STOP. Press ↠button PV to display CO1, press ↠↑↓ to set the starting temperature 50 (starting temperature should be higher than room temperature), press SET button, PV displays t01. Press â†â†‘↓ to set the starting temperature to the time required for the actual temperature (the time should not be short). Press the SET button PV to display C02. Press â†â†‘↓ to set the temperature required for work, press SET button PV to display t02, press â†â†‘↓ to set the required constant temperature time, press SET button PV to display C03, press â†â†‘↓ to set the actual temperature required (ie same as C02) Temperature), press the SET button PV to display t03, press â†â†‘↓ to set -121. Wait until the menu is returned (SV shows STOP). Press the ↓ button again for two seconds to start. At this point, the PV window shows the temperature rise. The SV shows temperature rise or time operation.
For example: to maintain a constant temperature of 400 ° C for 10 minutes.
Press ↠key once C01 = 50 (the starting temperature is slightly higher than the indoor temperature, such as 50 ° C.)
Press SET button to t01 =20 (in general, the heating time of this segment should not be too short, otherwise it is easy to overshoot.)
Press SET button once C02 = 400 (work requires temperature)
Press SET button to t02 =10 (constant temperature)
Press SET button once C03 = 400 (working temperature)
Press SET button to t03 =-121
Wait until the SV displays STOP and press the ↓ button for two seconds. SV displays RUN and starts. At this time, the PV shows that the measured temperature has risen. The SV display sets the temperature rise or time to run.
Program the normal operation method to turn on the power. Press the ↑ button for two seconds to make the SV window appear STOP. Setting procedure: Press the ↠key once, the upper row PV displays C01, indicating that the programmed starting temperature is required, and the â†â†‘↓ key is operated to make the lower row SV reach the desired starting temperature. Press the SET button again, PV displays t01, indicating the time from the start temperature to the next set temperature, and the â†â†‘↓ key to make the SV reach the desired time. Press SET again, PV displays C02, indicating the starting temperature C01 just set, using the time t01, the temperature to be reached, press â†â†‘↓ to make SV reach the desired temperature. (If constant temperature is required, C01 and C02 are set to the same value), and then press the SET button. The PV display t02 indicates the time setting from C02 to the next temperature. Press the previous step..., the last segment of the T parameter is set to "-121". It can be automatically shut down, up to 30 segments, and the last segment will be set by txx-121. SV will return to STOP and then press ↓ to make the display window appear. The RUN instrument will automatically start working according to the set program. The programming uses a temperature-time-temperature format, which is defined as setting the temperature from the current segment and reaching a temperature after the time set by the segment. Example: Set the program value according to the program curve shown in the figure below (from 40 degrees to 30 minutes to 30 degrees and then 35 minutes to 150 degrees to 40 minutes and then 30 minutes to 200 degrees to 25 minutes) Cool down to 180 degrees in 20 minutes and then cool naturally after 25 minutes.)
°C
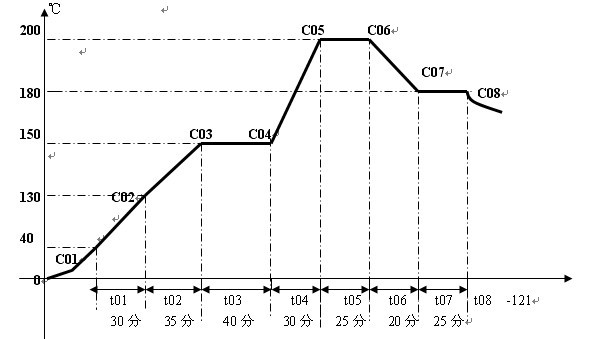 Press ↠key once C01 = 40 °C (program start temperature, you can also set any value slightly larger than room temperature)
Press SET button once t01 = 3 0 minutes Press SET button C02 = 130°C
Press the SET button once t02 = 35 minutes, press the SET button, C03 = 150 °C
Press the SET button once t03 = 40 minutes, press the SET button, C04 = 150 °C
Press the SET button once t04 = 30 minutes, press the SET button, C05 = 200 °C
Press the SET button once t05 = 25 minutes, press the SET button, C06 = 200 °C
Press SET button once t06 = 20 minutes Press SET button C07 = 180°C
Press the SET button once t07 = 25 minutes, press the SET button, C08 = 180°C
Press the SET button and t08 = -121 (end of program run)
Special Tips (1) The product has undergone rigorous testing before leaving the factory. Generally, it should not be corrected. If the environment is bad when used, the ambient temperature will exceed the appropriate range, which will cause the temperature display value to be in error with the actual temperature inside the box. Refer to the temperature controller operating instructions for correction as needed.
(2) If the instrument is in normal working condition, if the door opening time is too long, the temperature inside the box will change somewhat after the door is closed. This is normal.
(3) Test Note: The thermometer used in the test in the box should use a 0.1-precision mercury thermometer and place the mercury end in the geometric center of the box.
four. Technical Parameters
 Five, matters needing attention l, the instrument case must be effectively grounded to ensure safe use.
2, the instrument should be placed in a horizontal position in the room, no flammable and explosive materials can be placed around it.
3. One of the knife switches of the iron shell should be installed in the power supply line for the purpose of this box. Please check the electrical performance of the box before the earthing of the outer casing. Please pay attention to whether there is any open circuit or leakage. The instrument has no explosion-proof device. Do not put flammable and explosive materials dry.
4, the contents of the box should not be over-squeezed, you must leave room for hot air circulation.
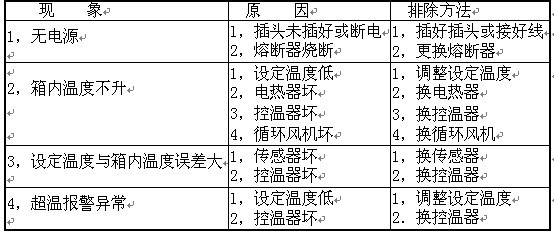
Sixth, failure and elimination
 |